IPSec tunnel using Linux TUN/TAP interfaces and python RAW Sockets.
DESCRIPTION
You need to have the knowledge of Ipsec Tunnel in deep before creating the program and of course you will need to know python language. In this article I will explain the concept of VPN, which will make sense while programming it. This is the implementation of the IPSec tunnel using Linux TUN/TAP interfaces and python RAW Sockets. This also includes the encryption part using AES algorithm.
IPsec Tunnel.
Transmitting IP packets through the public internet is a bad idea due to bad guys who might be waiting to grab our confidential data in IP packet payloads. One solution for this would be building our own wired network infrastructure with our own cables, routers and stuff which will be physically protected against wiretapping. However unfortunately, this is not practical. Therefore, the next choice we have is encrypting our IP packets as a whole or partially which can be sent as a payload of another IP packet through the Internet. This is how some flavors of IPSec work (i.e. ESP).
The major benefits of VPNs:
- A VPN is virtual in that it carries information within a private network, but that information is actually transported over a public network.
- A VPN is private in that the traffic is encrypted to keep the data confidential while it is transported across the public network.
- A VPN is a communications environment in which access is strictly controlled to permit peer connections within a defined community of interest.
- Confidentiality is achieved by encrypting the traffic within the VPN.
- Today, a secure implementation of VPN with encryption is what is generally equated with the concept of virtual private networking.
IPsec VPNs.
In the simplest sense, a VPN connects two endpoints, such as two remote offices, over a public network to form a logical connection.
The logical connections can be made at either Layer 2 or Layer 3.
Layer 3 VPNs can be point-to-point site connections, such as GRE and IPsec, or they can establish any-to-any connectivity to many sites using MPLS.
- IPsec is a suite of protocols developed with the backing of the IETF to achieve secure services over IP packet-switched networks.
- IPsec services allow for authentication, integrity, access control, and confidentiality.
- With IPsec, the information exchanged between remote sites can be encrypted and verified.
- Both remote-access and site-to-site VPNs can be deployed using IPsec.
Two Types of VPNs:
A remote-access VPN is created when VPN information is not statically set up, but instead allows for dynamically changing connection information, which can be enabled and disabled when needed.
A site-to-site VPN is created when devices on both sides of the VPN connection are aware of the VPN configuration in advance.
The VPN remains static, and internal hosts have no knowledge that a VPN exists.
IPsec is an IETF standard (RFC 2401–2412) that defines how a VPN can be secured across IP networks.
IPsec protects and authenticates IP packets between source and destination. IPsec can protect virtually all traffic from Layer 4 through Layer 7.
Using the IPsec framework, IPsec provides these essential security functions:
- Confidentiality using encryption
- Integrity using hashing algorithms
- Authentication using Internet Key Exchange (IKE)
- Secure key exchange using the Diffie-Hellman (DH) algorithm
Choosing the IPsec protocol encapsulation is the first building block of the framework.
IPsec encapsulates packets using Authentication Header (AH) or Encapsulation Security Protocol (ESP).
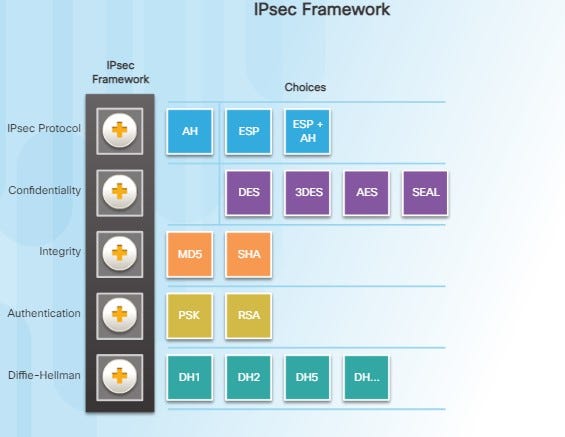
The choice of AH or ESP establishes which other building blocks are available.
AH uses IP protocol 51 and is appropriate only when confidentiality is not required or permitted.
It provides data authentication and integrity, but it does not provide data confidentiality (encryption).
All text is transported unencrypted.
ESP uses IP protocol 50 and provides both confidentiality and authentication.
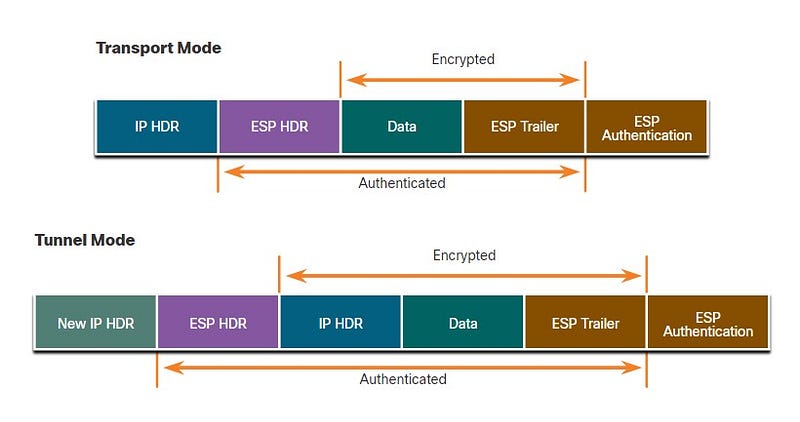
It provides confidentiality by performing encryption on the IP packet. .ESP provides authentication for the inner IP packet and ESP header.
Authentication provides data origin authentication and data integrity.
Although both encryption and authentication are optional in ESP, at a minimum, one of them must be selected.
ESP provides confidentiality by encrypting the payload.
It supports a variety of symmetric encryption algorithms.
If ESP is selected as the IPsec protocol, an encryption algorithm must also be selected.
AES Summary
AES was chosen to replace DES for a number of reasons.
The key length of AES makes the key much stronger than DES. AES runs faster than 3DES on comparable hardware.
AES is more efficient than DES and 3DES on comparable hardware, usually by a factor of five when it is compared with DES.
AES is more suitable for high-throughput, low-latency environments, especially if pure software encryption is used.
TUN Interfaces
TUN devices work at the IP level or layer three level of the network stack. TUN devices are usually point-to-point connections. TUN devices allows the VPN software a chance to encrypt the data before it gets put on the wire so the typical use for a TUN device is establishing VPN connections. TUN devices work at layer three it can only accept IP packets and in some cases only IPv4 and they can’t be used in bridges and don’t typically support broadcasting
TAP Interfaces
TAP devices work at the Ethernet level or layer two of the network stack so it behaves like a real network adaptor. It can transport any layer three protocol and aren’t limited to point-to-point connections because they are run in layer two. TAP devices can be part of a bridge. TAP devices are commonly used in virtualization systems to provide virtual network adaptors to multiple guest machines.
Python Packages
- import threading
- import socket
- import os
- import argparse
- import netifaces
- import struct
- import fcntl
- import sys
- import time
- from Crypto.Cipher import AES
- from ctypes import *
and some custom imports from my diff files
# CUSTOM IMPORTS
from imports.headers import IPHeader, ESPHeader, unpack_ipv4
from imports.aes import AESCipher
IPsec Tunnel Task
In this assignment, your task is to implement a small system using which two hosts can communicate with each other securely. It is important to make sure that our IP packet encryption and decryption functionalities are transparent to the application layer. You are not required to implement something completely compatible to IPSec following the standard. It is good enough to implement a your own mechanism to encrypt IP packets and putting them in the payload of another IP packet.
If we intercept the packets going between the two hosts using Wireshark, in current case, we will be able to see the IP packets with a TCP payload. The TCP payload is the encapsulated IP packet in plain text. You need to improve the security of this connection x and the amount of marks you get is proportional to how close your implementation is to IPSec. If you improve the tun-client.c and tun-server.c programs to encrypt/decrypt the IP payload before sending through the TCP tunnel, you get 60% which is the minimum acceptable work. When I run Wireshark, I should be able to still see the outer IP header and TCP header but the payload must be encrypted.
If you switch the connection x to a raw socket connection and implement something like IPSec ESP transport mode, you will get 80%. When I run Wireshark, I should be able to see the original IP header of the packet came from the ping program but anything beyond should be encrypted. (your packet structure for the ESP header does not have to be same as the original IPSec specification.)
If you switch the connection x to a raw socket connection and implement something like IPSec ESP tunnel mode, you will get 100%. When I run Wireshark, I should be able to see only the new IP header which is not what came from the ping program. Our full original IP packet should be encrypted and placed in the payload of the outer IP packet. (your packet structure for the ESP header does not have to be same as the original IPSec specification.)
In the Ubuntu Machine 20.10, run following commands to setup a TUN interface called asa0.
- sudo ip tuntap add dev asa0 mode tun
- sudo ip addr add 10.0.1.1/24 dev asa0
- sudo ip link set dev asa0 up
- ip addr show

In the CentOs Machine , run following commands to setup a TUN interface called asa0.
- sudo ip tuntap add dev asa0 mode tun
- sudo ip addr add 10.0.1.2/24 dev asa0
- sudo ip link set dev asa0 up
- ip addr show
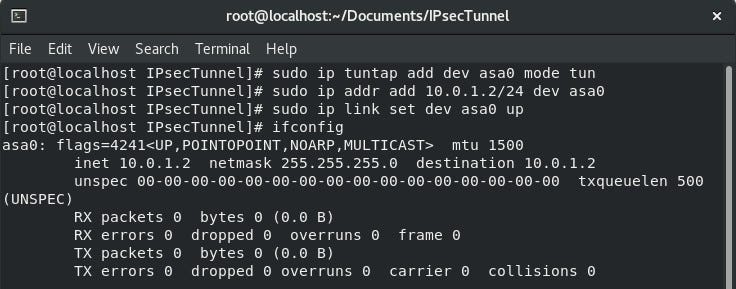
Basically, This Tunnel program runs in ubuntu box with TWO NIC interface, which one is assigned a static Ip Address and other one is TUN interface that works as a virtual NIC. We have to excute the same file in both the machines to work. After excuting I will do a ICMP test using {ping} from Virtual NIC (asa0) on VM1 to VM2. Use the following command ping -I 10.0.1.1 10.0.1.2. The Ping will send a ICMP request from vm1 to vm2 but the asa0 has no routing therefore my Ipsec program will capture the traffic and encrypt the packet with AES algorithm. Then I encapsulates the packet within new IP packet and send it to Physical NIC on VM2. When the packet arrives to VM2’s physical NIC, It decrypt the packet and Write it into It’s Virtual NIC(asa0). Then VM2’s Virtual NIC will send a ICMP reply to the request (ping), Ipsec will program capture the packet and encrypt it. Thats how the tunnel works.
EXAMPLE
Virtual Machines used for testing :
- Ubuntu 20.10
- CentOs Linux
UBUNTU VM
- Physical Interface = 192.168.1.1/24 Static Ip
- Logical Interface (asa0) = 10.0.1.1/24 Static Ip
CENTOS VM
- Physical Interface = 192.168.1.100/24 Static Ip
- Logical Interface (asa0) = 10.0.1.2/24 Static Ip
UBUNTU MACHINE
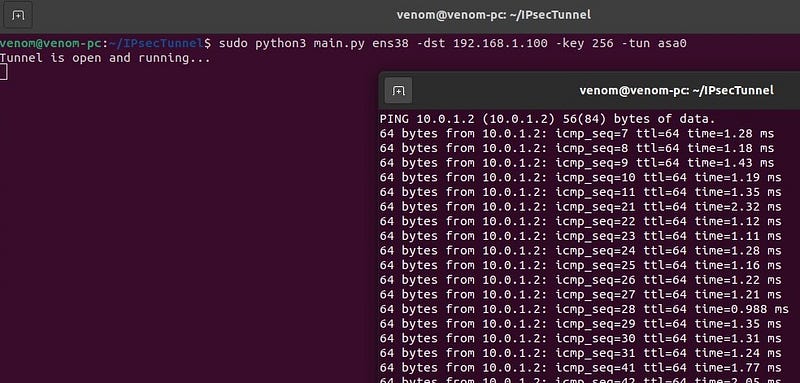
CENTOS MACHINE
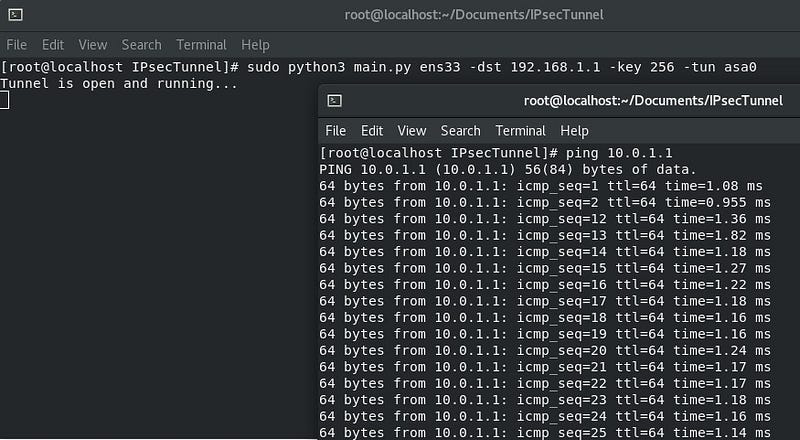
- Runing the script is simple, you must have root privelages. Run the
main.pyfile to begin the Tunnel. sudo python3 main.py ens38 -dst 192.168.1.100 -key 256 -tun asa0.

- Must run this on both the Machine with the correct parameters.
- Requirements to run this Tunnel.
— Python 3.8.2
— Ubuntu 20.10 Virtual Machine.
— Four Interfaces with IP configured. - Dependencies.
— pip3 install pycryptodome
— pip3 install netifaces
— pip3 install argparse
Originally published at https://github.com.

