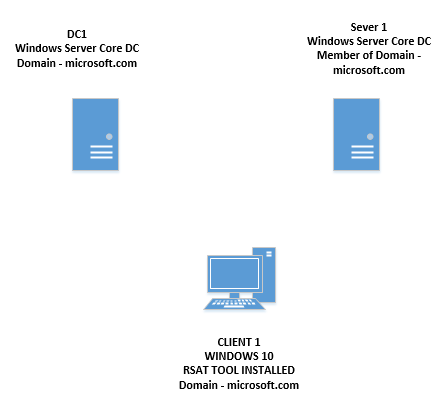
INTRODUCTION
DHCP is a networking protocol that automates the process of assigning IP addresses to devices on a network. It eliminates the need for manual IP address configuration, making network management more efficient and less prone to errors.
With Windows Server DHCP, you can centrally manage and distribute IP addresses, subnet masks, default gateways, and other network configuration parameters to client devices. This ensures that each device connected to your network receives the necessary network settings automatically.
Setting up DHCP on a Windows Server is a breeze. By configuring a DHCP server role, you can allocate and manage IP addresses dynamically, saving time and effort. Whether you have a small office network or a large enterprise environment, Windows Server DHCP simplifies the process of IP address assignment, reducing administrative overhead.
In this blog post, we’ll dive into the essential concepts of Windows Server DHCP, including configuring scopes, managing reservations, and troubleshooting common issues. By the end, you’ll have a solid understanding of how DHCP works and be ready to harness its power to streamline your network infrastructure.
HOW DHCP WORKS?
Dynamic Host Configuration Protocol (DHCP) is a client/server protocol that automatically provides an Internet Protocol (IP) host with its IP address and o
there related configuration information such as the subnet mask and default gateway. RFCs 2131 and 2132 define DHCP as an Internet Engineering Task Force (IETF) standard based on Bootstrap Protocol (BOOTP), a protocol with which DHCP shares many implementation details.
DHCP allows hosts to obtain required TCP/IP configuration information from a DHCP server.
Installing and Configuring DHCP
View Available commands for DHCP
Get-Command *DHCP*Install DHCP on remote server
Get-WindowsFeature -Name *DHCP* -ComputerName s1
Install-WindowsFeature -Name DHCP -ComputerName s1
Authorize DHCP server in Domain
Add-DhcpServerInDC -DnsName s1 -IPAddress 192.168.3.50
Get-DhcpServerInDC
Adding Users to DHCP group and the user will get the DHCP ADMIN
- Select a User and go to property
- Select Memberof Tab
- Type DHCP administrator
- Click Okay.
DHCP CONSOLE using RSTAT
- DHCP console
- ADD SERVER
- Select authorized server
- Click Okay
DHCP Scopes and Options
DHCP SCOPES
The scope is a range of valid IP addresses available for lease to the DHCP client computers on the network.
DHCP EXCLUSIONS
An exclusion is an address or range of addresses taken from a DHCP scope that the DHCP server is not allowed to hand out
DHCP RESERVATIONS
When you use DHCP IP reservation, you’re telling network to assign the same IP address to a specific device whenever that device connects to your network
DHCP OPTIONS
Scope Level Options : Configuring settings DNS server, routers, time servers
Server Level Option : Option pass down to EVERY scope
CREATING IPV4 SCOPE
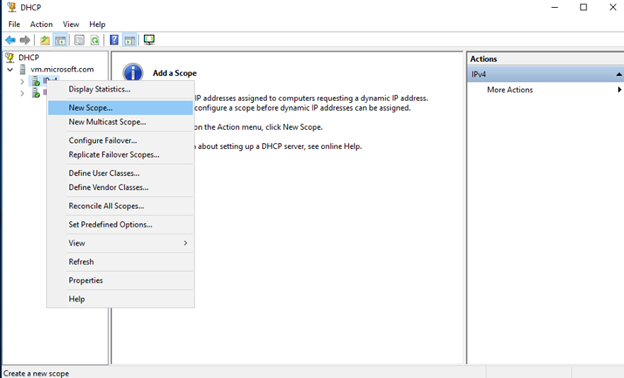
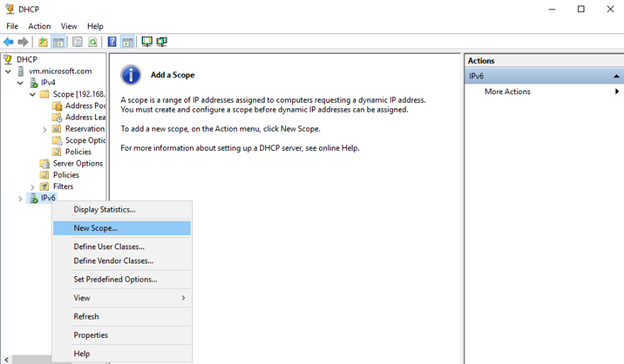
Open the DHCP management console by navigating to “Server Manager” > “Tools” > “DHCP”.
In the DHCP management console, expand the server name and right-click on “IPv4”. Select “New Scope…” from the context menu.
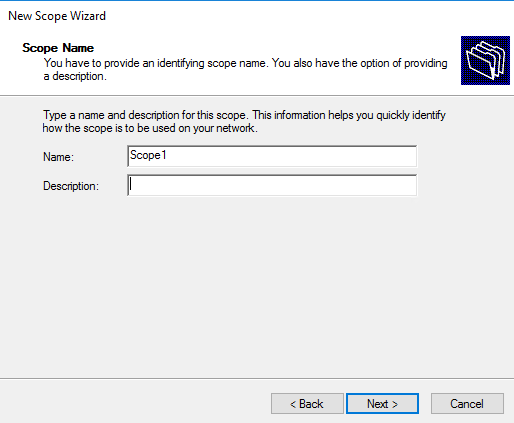
Enter a name and description for the new IPv4 scope. Click “Next” to continue.
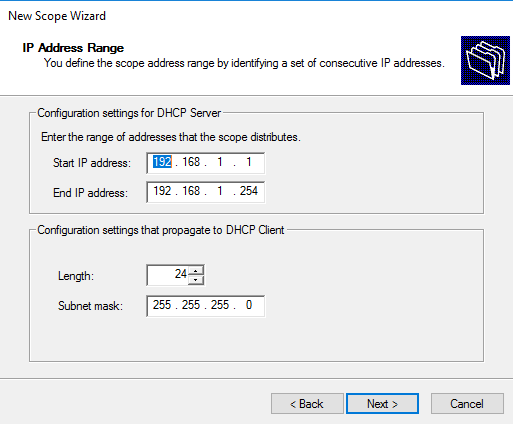
Specify the starting and ending IP addresses for the scope. Click “Next” to proceed.
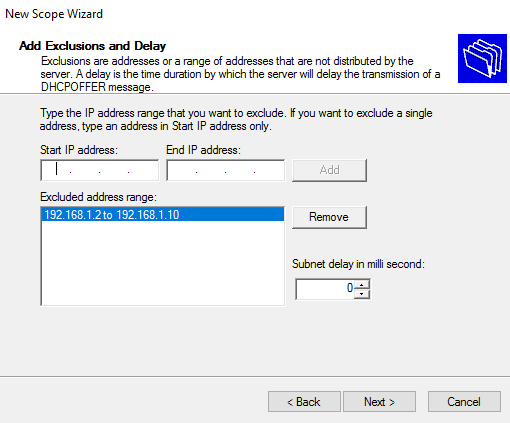
Specify any IPv4 exclusions if needed. Exclusions are IP addresses that will not be assigned by the DHCP server. Click “Next” to continue.
Click Next.
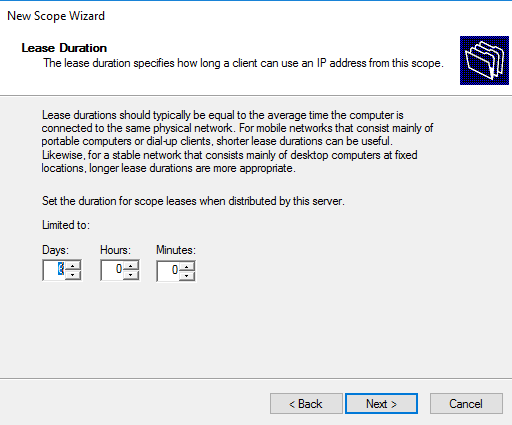
Configure the lease duration for the IP addresses in the scope. You can choose the duration based on your network requirements. Click “Next” to proceed.
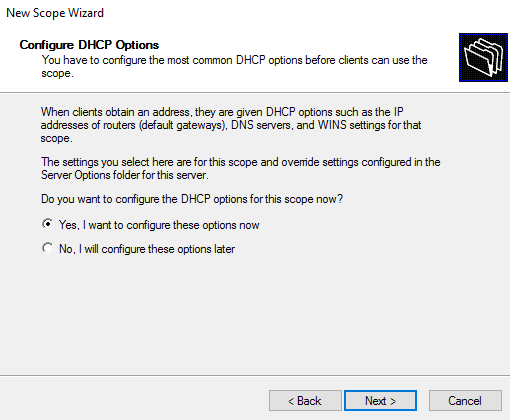
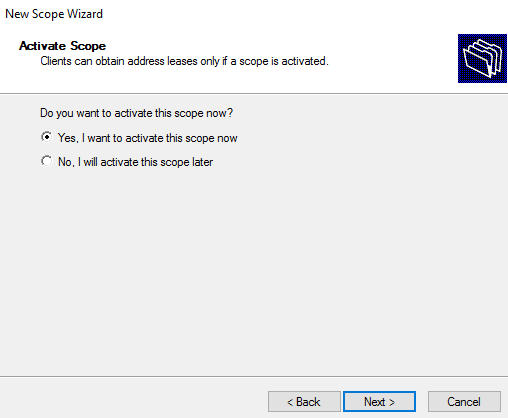
Select YES, and click Next.
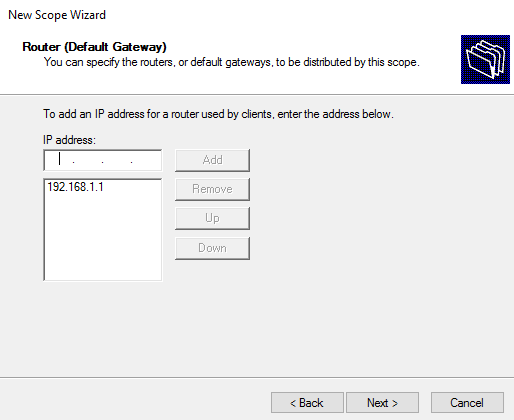
Click Next, and assign the Default Gateway IP Address
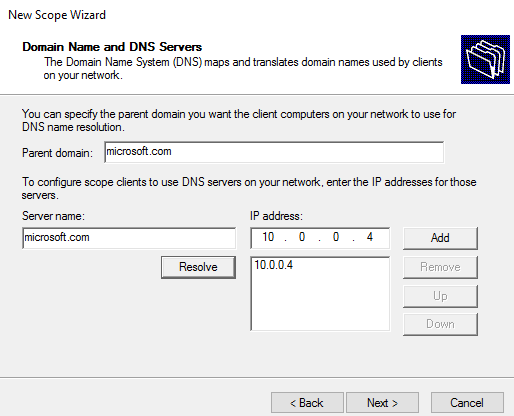
Configure the Domain Name and DNS Servers.
Select YES, and Activate the SCOPE
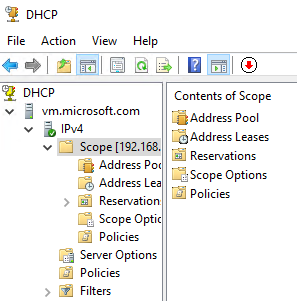
The new IPv4 scope will now be visible in the DHCP management console.
POWERSHELL
#region Configure DHCP Scopes
Get-Command *DHCPServerv4Scope* -Module DHCPServer

Add-DhcpServerv4Scope -ComputerName DC1 `
 -Description ‘Scope ’ `
 -Name ‘192.168.1.0 Scope’ `
 -StartRange 192.168.1.100 `
 -EndRange 192.168.1.254 `
 -SubnetMask 255.255.255.0 `
 -LeaseDuration 08:00:00 `
 -Type Dhcp `
 -State Active

Add-DhcpServer4ExclusionRange -ComputerName DC1 `
 -ScopeId 192.168.2.0 `
 -StartRange 192.168.2.1 `
 -EndRange 192.168.2.100

#Verify DHCP Scopes
Get-DhcpServerv4Scope -ComputerName DC1

Get-DhcpServerv4Scope -ComputerName DC1 -ScopeId 192.168.2.0 | format-list

Get-DhcpServerv4ScopeStatistics -ComputerName DC1 -ScopeId 192.168.2.0 | fl
#end region
Setting DHCP Options
GUI
Scope Option is specially for one scope
you can see under each scope
scope option
To Assign Server options for all the scope at once
you must choose “Server Options”
Configure option with right click
and select the servers you want to add
POWERSHELL
#region DHCP Options
Get-Command *OptionValue* -Module DHCPServer

#Set Server Options
Set-DHCPServerv4OptionValue `
 -DnsServer 192.168.3.10 `
 -DnsDomain company.pr `
 -ComputerName DC1.company.pri

#Set Time Server for Network at server option level
Set-DHCPServerv4OptionValue `
 -OptionId 042 `
 -Value 192.168.3.1 `
 -ComputerName DC1.company.pri

Get-DhcpServerv4OptionValue -ComputerName DC1

#Set Scope Option
Set-DHCPServerv4OptionValue `
 -ComputerName DC1
 -ScopeId 192.168.5.0 `
 -Router 192.168.5.1 `

Get-DhcpServerv4OptionValue -ComputerName DC1 -ScopeId 192.168.5.0 | FL
#EndRegion
Creating Super Scopes
Super scopes allow us two or more scopes and basically pull them together so that we can manage them as a single entity.
Example: Building has too many floors and has different subnet and wants to make the scope once.
Superscopes are like CONTAINERS
GUI
- Right clicking the IPv4 in DHCP Console
- then New Super Scope
- Name
- List of Available scopes and choose
- FINISH
And you can deactivate by right clicking the super scope
POWERSHELL
#region SuperScope
Get-Command *SuperScope* -Module DHCPServer

Add-DHCPServerv4Superscope `
 -Superscope ‘New SuperScope’
 -ComputerName DC1`
 -ScopeId 192.168.3.10,192.168.4.0

Get-DHCPServerv4Superscope -ComputerName DC1
Creating a DHCP Reservation
GUI
- You can go to Address Leases
- right click to add the Devices to reservation
Or
You can right click reservation and NEW reservation and give you own Information.
POWERSHELL
Get-DhcpServerv4Lease `
 -ComputerName DC1 `
 -ScopeId 192.168.3.0

Get-DhcpServerv4Reservation `
 -ComputerName DC1 `
 -ScopeId 192.168.3.0
Configuring a DHCP Policy
This allows me to create a policy so that I can distribute specific configurable settings like my IP address DHCP options, to clients based on certain conditions they might make, such as a Mac address or a vendor class or a user class.
I can append that with a wild card. So, what that means is that all printers with that Mac address beginning with that will meet the conditions of this policy. So, I click. OK,
Multicast Address Dynamic Configuration Allocation Protocol
It’s used to support dynamic assignment and configuration of IP multicast Addresses on TCP/IP based network.
Provide Addresses in multicast range of 224.0.0.0 to 239.255.255.255
It’s used for clients such a streaming audio or video
Single point of content going to many points
it’s important to know clients still meeting I’d be addressed that allows him to communicate on IP networks outside of the multicast range so clients can have a traditional IP address for communicating on their network and a multicast address for when they need to access, multicast networks and content.
Creating Multicast Scopes
So, client can access streaming audio training that available to all the users in microsoft.com
GUI
- Right clicking the Ipv4 in DHCP console
- selecting New Multicast Scope
- and then give the right information
POWERSHELL
#region DHCP Multicast Scope

Get-Command *Multicast Scope* -Module DHCPServer

Add-DhcpServerv4Multicast Scope
 -ComputerName DC1 `
 -Name ‘Video Streaming Scope’ `
 -Description ‘This scope for video streamers’ `
 -StartRange 255.0.0.1 `
 -EndRange 255.0.0.254 `
 -State Active `
 -LeaseDuration 15:00:00
Get-DhcpServerv4MulticastScope -ComputerName DC1
DHCPv6 on Windows Server
IPv6 Basics
Ipv6 128-bit values and written in 8 groups of four hexadecimal digit,
2001:2001:2001:2001:2001:2001:2001:2001
- Allows auto-configuration of clients
- Routers do more work — perform like
- Ipv4 has GATEWAY
- Ipv6 Handles through router advertisement from the local router. these advertisements are providing the local Gateway for ipv6 clients so adding a DHCP is unnecessary
Obtaining IPv6 Addresses
STATIC :
- Where you manually setup ipv6
STATELESS ADDRESS AUTOMATIC CONFIGURATION (SLAAC) :
- This is where the client automatically set its own unique ipv6 address
- Allow host to generate address using a combination of local information and information advertise by router
- Router Advertisements utilized
- DHCPv6 Can be used only for configuration information
STATEFUL ADDRESS AUTOMATIC CONFIGURATION (DHCPV6) :
- Server-Provided address and/or configuration information
- Used for non-link local addressing
- Utilizes DHCPv6
Router Advertisement Flags
Client computers receive flags that helped the ipv6 host auto configuration
M flags = (Managed Address Configuration flag)
if this is set to 1
it instructs the host to use dhcpv6 to obtain stateful address
O flags = (Other Stateful Configuration flag)
if this is set to 1
it instructs the host to use configuration protocol to obtain other configuration settings
Setting a Remote IPv6 Address
POWERSHELL
#region — Set Remote IPv6 Address on DC1
 #Remote Session to DC1

$Cimsession = New-CimSession -ComputerName DC1
Get-NetIPConfiguration -CimSession $cimsession

#Set IP Address remotely on DC1
New-NetIPAddress `
 -Interfaceindex 2 `
 -CimSession $cimsession `
 -IPAddress 2001:2001:2001:2001:2001:2001:2001:10 `
 -PrefixLength 64 `
 -DefaultGateway 2001:2001:2001:2001:2001:2001:2001:1

 #Bind DHCPv6 Server to use Ethernet adapters
Set-DhcpServerv6Binding `
 -ComputerName DC1 `
 -BindingState $true `
 -InterfaceAlias Ethernet

Get-DhcpServerv6Binding -ComputerName DC1
Creating an IPv6 Scope
Open the DHCP management console by navigating to “Server Manager” > “Tools” > “DHCP”.
In the DHCP management console, expand the server name and right-click on “IPv6”. Select “New Scope…” from the context menu.
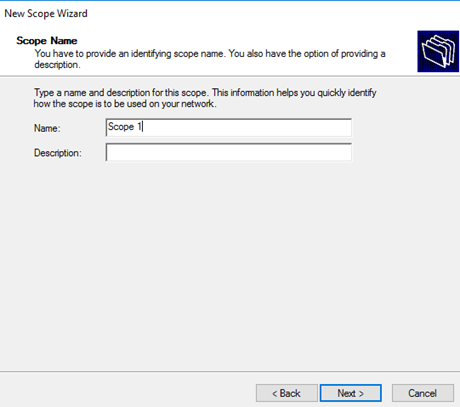
Enter a name and description for the new IPv6 scope. Click “Next” to continue.
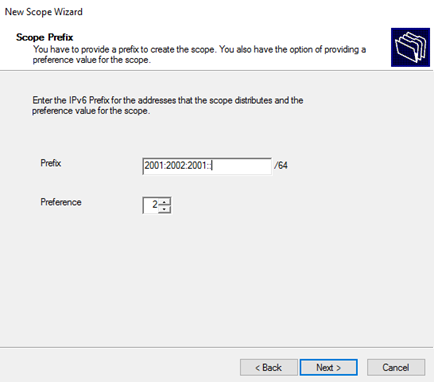
Specify the length of the prefix and the subnet prefix length. Click “Next” to proceed.
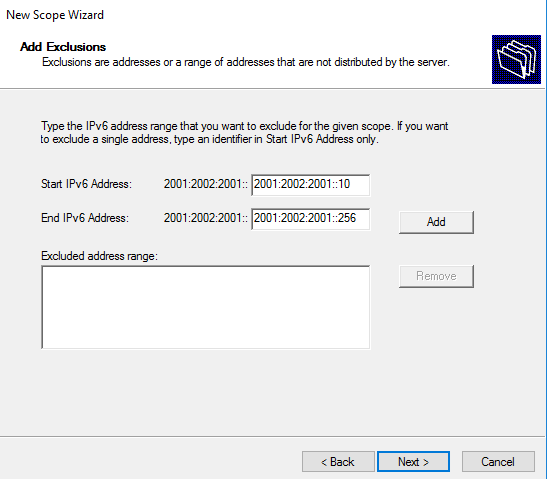
Specify any IPv6 exclusions if needed. Exclusions are IP addresses that will not be assigned by the DHCP server. Click “Next” to continue.
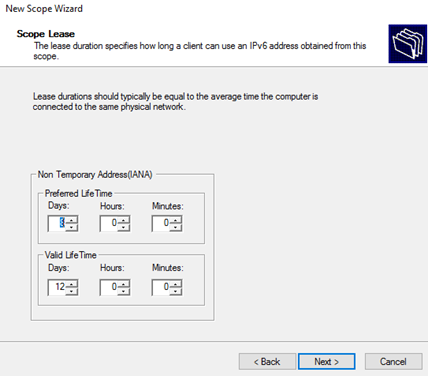
Configure the lease duration for the IP addresses in the scope. You can choose the duration based on your network requirements. Click “Next” to proceed.
Review the summary of the scope configuration. If everything looks correct, click “Finish” to create the new IPv6 scope.
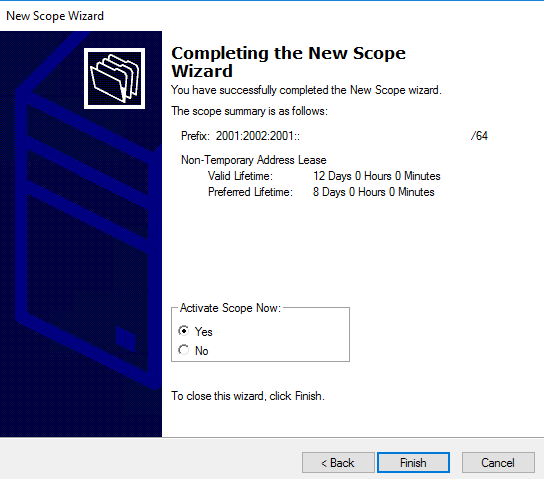
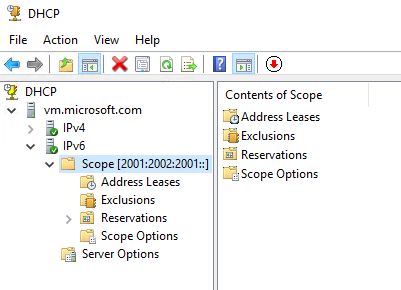
The new IPv6 scope will now be visible in the DHCP management console.
POWERSHELL
#create scope
Add-DhcpServerv6Scope `
 -ComputerName DC1 `
 -Prefix 2001:2002:2001:: `
 -Name ‘company.pr IPv6 Scope’ `
 -Preference 2 `
 -State Active

#Add Exclusionary Range
Add-DhcpServerv6ExclusionRange `
 -ComputerName DC1 `
 -Prefix 2001:2002:2001:: `
 -StartRange 2001:2002:2001::10 `
 -EndRange 2001:2002:2001::256 `

#Set DNS Server at Server Option level
Set-DhcpServerv6OptionValue `
 -ComputerName DC1 `
 -DnsServer 2001:2001:2001:2001:2001:2001:2001:10 `
 -Force

#Restart
Restart-Computer

#Verify IPv6 Address Information
Get-DhcpServerv6Scope -ComputerName DC1 | fl
Get-DhcpServerv6ScopeStatistics -ComputerName DC1 | fl
Get-DhcpServerv6ScopeStatistics -ComputerName DC1 -Prefix 2001:2002:2001::